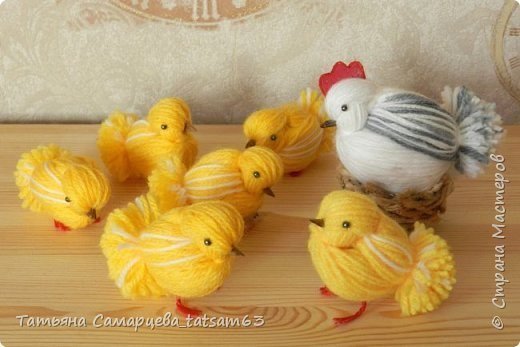
Chickens from the yarn

The scheme is based on the manufacture of the aforementioned Proshka, but since there are differences that make separate workshop. Hopefully, everything will be clear.
To produce chicks will need:
• wool or other yarn yellow;
• The cardboard templates (since the dimensions are small, I took advantage of advertising calendars, they cut off a little);
• little foam;
• For the eye – beads;
• For nozzles – apple seeds and glue;
• For the feet – red strings (such as Iris), a piece of plastic and glue. I use adhesives such as Titan (TITAN WILD, AXTON), they dry quickly, but you can PVA.
yarn is wound onto cardboard. The templates of this size:
– Breast – 8 cm
– backrest – 7 cm
– Wings – 6 cm
Cut winding beam and get three threads. In the middle of the longest beam (breast) pulls a bit of thread (otherwise the head will be too small). The back is left as is, and the wings are in the middle of bandages. I added to the flaps 3-4 white strings. Why – I do not know, it just seemed better.
A piece of foam wrapped with thread, to get a round or slightly oval-shaped ball. This will be the tummy chicken.

Getting “assembly” chicken. Breast and back overlapping that they “catch” midway.

To tie each bundle in the coupling to form the crown.

If you add together the back and breast, its (head) is already clearly visible. But let’s not rush.

Expand the breast and back, so that his head was down and out on the connection impose across wings, and on top – a ball-tummy. Without touching the wings, wraps bundles of breast and back foam ball. Gently straighten the back and breast, and connecting the ends together, tying a ponytail. The length should be enough, if not enough, make another “belly” smaller.

The tail is asymmetrical, short back, breast longer, but it must be so, because in almost any part of the large amount of birds falls on the breast and belly.

If any thread is lost, with a hook dressed with her so that she fell into place. I do not know how to get you, and I use quite often hook to put the strings gently.

Gently pruning tail, he becomes like a pompoms.

To make the resulting work piece in chick, there is not much: beak-seed paste and sew / glue the eyes. I like to sew, picking up the thread color.

Now, decide if you want your little bird legs or not. In my opinion, chickens, and without them are good, you can take them into the palm, cuddle, and nothing will get in the way. From the beginning I planned to plant them in a nest, as in the photo, and in this case, the legs are not particularly needed, can not see them.
But my husband insisted that chicks with legs are better, however, as they do not say. For the sparrow Proshka invited to make feet of wire and wrap the thread. This notion is very interesting, but I did not want to combine soft and tender nestlings with a rigid structure. Besides, I do not know at what age can give children birds with hard wire legs, I wanted to make a safe design for any age. I had to invent itself.

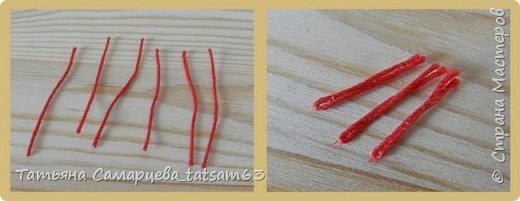
So, who decided to put their chicks on their feet – start. We obtain the aforementioned piece of flat plastic, and it will work.
Take the red line of the type of Iris and cut into pieces of 5 cm per 6 pieces of chicken. Then, add up each thread about half (about – because we then cut, then do not waste time on alignment). Each segment – a “finger.” On the tip of a toothpick recruit kapelyushechku glue and grease the thread of the folded seats fold to about the middle. I use glue type “Titan”, and if a little glue, you should spend a couple of times with your fingers, compressing the thread – and it is almost dry. PVA will dry longer. When harvesting dry, you can start assembling the legs.
Take the three “fingers”, adds them together, that the average was slightly longer than the side. Unsealed still part of thread smeared with glue, twist the rope and fold back foot perpendicular. Samu foot grease the bottom with glue, a little, and stick to the plastic, gently stroking “fingers” that the foot was flat. After drying separate the legs from the substrate and cut off the excess glue solidified. Cut the top of the legs, leaving the desired length and glue in the legs in place.
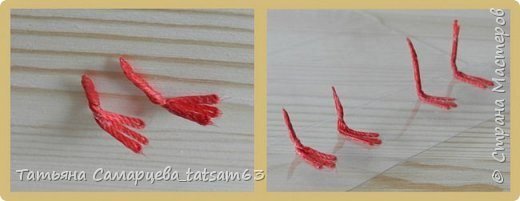
Now – paws up! – Dry. I think the funniest picture turned out 🙂

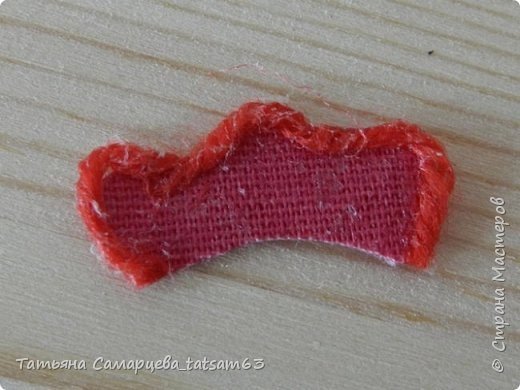
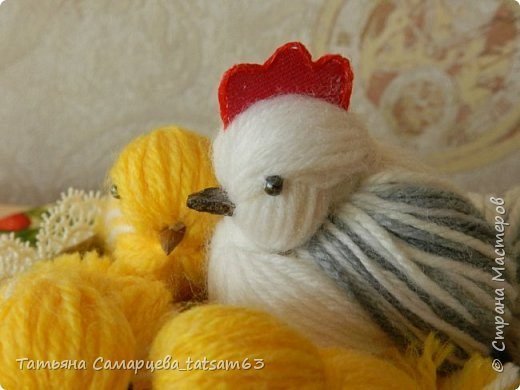
While dried chicken legs, talk about the hen. It is made in the same way as chickens, only templates genuine, and tummy (ball inside) more for solidity. What makes it really chicken – a scallop. Here on it and dwell. Photo is only one, but I think everything will be so clear.
What is needed for the scallop:
• Two pieces of fabric right color measuring 2 by 3 cm. This is a reserve for trimming, the final size of scallops I get about 1-1, 5 cm in height and 2-2.5 in length;
• Clay;
• red woolen thread;
• A small piece of plastic – on which to dry.
The process of making the scallop:
1. Glue two pieces of fabric glue on the plate and leave to dry completely. Clay is necessary for the rigidity of the scallop.
2. Cropped blank: top – shaped crest, from the bottom of the arc shape of the head.
3. Top comb (the visible part of it) fining woolen thread, and again allowed to dry.
4. Glue the comb to the head.
Chicken is ready!

And the chickens gathered around her.
Someone clinging to his mother, those who dared, we went for a walk.

I look at them and do not get tired to wonder what they are all different. The materials are the same, the hands (my) are the same, each with its own character.

See, admire, and best of all – make their chicks!
Thank you! All of success!