How to make brooch in the painting

long enough chose a suitable for the master class work. I wanted to find something uncomplicated in the construction (in order not to scare away those who are far from drawing as such), but at the same time not boring in the color decision. Therefore, my choice fell on the work of the famous representative of Post-Impressionism Paul Cezanne. The randomness and contrast of curving lines of different colors is what we need!
brooch in the painting
Materials that are very useful:
Pencil and sketch paper;
Embroidery frame;
Bead needle;
scissors;
Mulina (in my work I used the threads of the firm “Gamma”);
Beads and sequins of necessary colors;
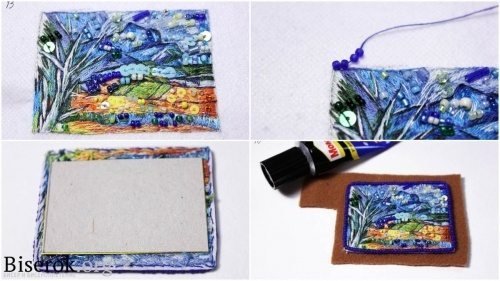
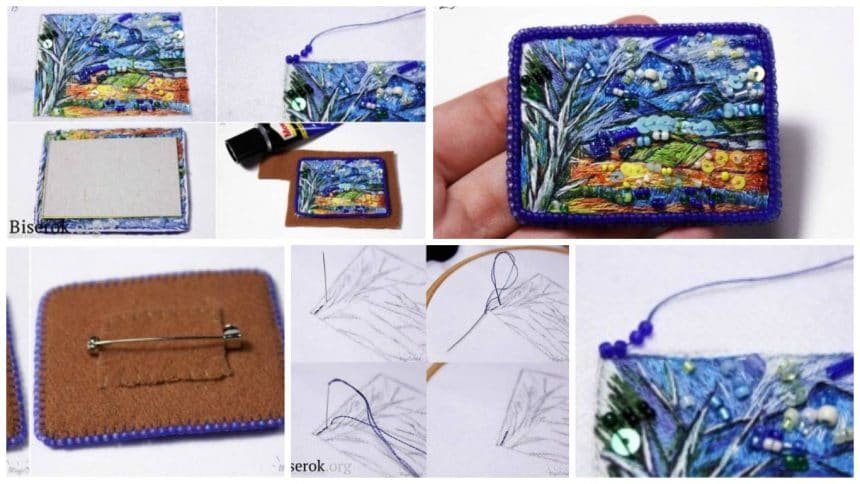
Glued fleece (you can use any convenient fabric + tracing paper, for more details see MK);
Woolen flannel or felt (material of the wrong side);
Glue “Moment-gel”;
A small piece of cardboard;
Metal clasp for a brooch.

brooch in the painting

This MK is my approximate plan of action when working on brooches based on pictures. By this description, you are entitled to make a similar product for any image you like
After choosing the picture you want to take as the basis of the work, we make a sketch. If the picture is quite complicated, and you could not draw it in the right proportions, you can simply print the workpiece of the required size.
Put a layer of nonwoven on the sketch and outline the outline. After transferring the image, we glue 4 more layers of non-woven fabric on the reverse side (using an iron) – this is our base for embroidery.
* For paintings with a lot of small details, I use tracing paper. Transfer it to the desired picture, attach to the base of tailor’s pins and embroider directly on it. At the end of the work, excess pieces of tracing paper are easily removed.
brooch in the painting
We fix the base on the embroidery frame, without them it is better not to embroider because There is a high probability of uneven stretching of the fabric with threads, which will cause the picture to skew.
I embroider a mulina of firm “Gamma”, preliminary having disassembled them on separate threads. In my opinion, they have the most advantageous price-quality ratio, and one more advantage is availability. They are almost in every needlework shop.
I use the seam “Back needle” for the contours and “Straight scattered stitches” (yes, this method also has a name 🙂 for the main embroidery. See Schemes A and B.
brooch in the paintingbrooch in the painting
I always try to embroider the contour and the shadows first, then the medium shades, and at the end already overlap the lightest areas. But, since, there are almost no clearly defined forms (except for mountains and trees), I just follow the rule from the lessons of IZO-drawing from the top down. Seed beads and sequins sewing on the course of embroidery all the same thread mulina. But I draw your attention to the fact that each bead must be stitched several times.
brooch in the painting
After the main work on the embroidery is finished, we make out the beaded frame. We sew through two beads arch (all the same “back needle”) seam. Scheme B.
brooch in the painting
We cut out the resulting image along the edge, leaving no empty areas of non-woven fabric, but also without cutting the thread.
To stiffen the brooch, cut out a piece of cardboard (the size along the length and width should be about 0.5 cm smaller than the brooch, in my case the size of the brooch is 6×4 cm, the cardboard is 5.5×3.5 cm). Lubricate the glue “Moment-gel” on the wrong side and glue the cardboard.
brooch in the painting
Then we paste the embroidery with cardboard onto the flannel.
Crop excess.
brooch in the painting
We sew the edge of the article in an American way (I will not go into detail on it, there are a huge number of master classes on the net).
Sew a clasp, glaze with glue for static, and sew a piece of flannel.
brooch in the painting
courtesy: translate.google